はじめに
Jetson Nano の Node-RED で TensorFlow モデルを試した際に GPU リソースを使用する手順をまとめておきます。(TensorFlow 1.x, JetPack 4.3)
環境
TensorFlow.js を Node.js で利用する場合、Jetson Nano の GPU リソースを使用するためには環境が重要です。
- @tensorflow/tfjs-node の最新バージョン(2021年5月3日時点)は v1.7.4
- TensorFlow v1.15.0 が指定されている
- TensorFlow shared libraries が必要だが、arm64 でビルドされたものを custom-binary.json で指定する必要がある
- arm64 でビルドされた TensorFlow shared libraries は CUDA 10.0 と cuDNN 7 ライブラリを使用している
Jetson Nano の環境は JetPack 4.3 を使用する必要があります。
(最新の JetPack 4.5.1 を使用するとエラーが出て使用できませんでした。)
| リリース時期 | JetPack | CUDA | cuDNN | 対象 |
|---|---|---|---|---|
| 2019/12 | 4.3 | 10.0.326 | 7.6.3 | o |
| 2020/7 | 4.4 | 10.2.89 | 8.0.0 DP | - |
| 2020/7 | 4.4.1 | 10.2.89 | 8.0.0 DP | - |
| 2021/1 | 4.5 | 10.2.89 | 8.0.0.180 | - |
| 2021/2 | 4.5.1 | 10.2.89 | 8.0.0.180 | - |
手順
簡単に試したい場合は、後ろの手順(簡単に試す場合の手順)を参照してください。
1. Node-REDのインストール
以下のコマンドを実行して、Jetson Nano に Node-RED をインストールします。
$ bash <(curl -sL https://raw.githubusercontent.com/node-red/linux-installers/master/deb/update-nodejs-and-nodered)
質問を聞かれた場合は、y を入力します。(2回)
Are you really sure you want to do this ? [y/N] ? y
Would you like to install the Pi-specific nodes ? [y/N] ? y
2. @tensorflow/tfjs-node のインストール
TensorFlow.js を Node-RED(Node.js) で使用するために、@tensorflow/tfjs-node モジュールをインストールします。
$ cd ~/.node-red
$ npm i @tensorflow/tfjs-node@1.7.4
エラーが表示されるので、以下の手順を実施します。
$ cd node_modules/@tensorflow/tfjs-node
custom-binary.json ファイルを作成します。
$ vi scripts/custom-binary.json
{
  "tf-lib": "https://s3.us.cloud-object-storage.appdomain.cloud/tfjs-cos/libtensorflow-gpu-linux-arm64-1.15.0.tar.gz"
}
再度インストールします。
$ npm i
3. node-red-contrib-tfjs-coco-ssd のインストール
COCO モデルを使用した SSD によるオブジェクト検出を試すために、 node-red-contrib-tfjs-coco-ssd モジュールをインストールします。
node-red-contrib-tfjs-coco-ssd は 依存関係に @tensorflow/tfjs-node モジュールのバーション 1.4.0 が指定されているため、最新バージョン (1.7.4) へ変更する必要があります。
$ cd ~/.node-red
$ npm i node-red-contrib-tfjs-coco-ssd
エラーが表示されるので、以下の手順を実施します。
$ cd node_modules/node-red-contrib-tfjs-coco-ssd
package.json の依存関係で、@tensorflow/tfjs-node に指定されているバージョンを 1.4.0 から 1.7.4 へ変更します。
        "@tensorflow/tfjs-node": "1.4.0",
↓
        "@tensorflow/tfjs-node": "1.7.4",
エラーが表示されるので、2. @tensorflow/tfjs-node のインストールと同様に、以下の手順を実施します。
$ cd node_modules/@tensorflow/tfjs-node
custom-binary.json ファイルを作成します。
$ vi scripts/custom-binary.json
{
  "tf-lib": "https://s3.us.cloud-object-storage.appdomain.cloud/tfjs-cos/libtensorflow-gpu-linux-arm64-1.15.0.tar.gz"
}
再度インストールします。
$ npm i
package-lock.json を削除します。
(@tensorflow/tfjs-node モジュールのバーション 1.4.0 をインストールした情報が残っているため)
$ cd ~/.node-red
$ rm package-lock.json
4. Node-RED を起動します。
$ node-red-start
Node-RED の起動ログが表示されますので、起動が完了したら Ctrl + C で抜けます。
停止する場合は、以下のコマンドを実行します。
$ node-red-stop
簡単に試す場合の手順
node-red-contrib-tfjs-coco-ssd モジュールを fork して導入手順を簡略化しています。
1. Node-REDのインストール
以下のコマンドを実行して、Jetson Nano に Node-RED をインストールします。
$ bash <(curl -sL https://raw.githubusercontent.com/node-red/linux-installers/master/deb/update-nodejs-and-nodered)
質問を聞かれた場合は、y を入力します。(2回)
Are you really sure you want to do this ? [y/N] ? y
Would you like to install the Pi-specific nodes ? [y/N] ? y
2. @kitazaki/node-red-contrib-tfjs-coco-ssd のインストール
$ cd ~/.node-red
$ npm i @kitazaki/node-red-contrib-tfjs-coco-ssd@0.0.3
エラーが表示されるので、以下の手順を実施します。
(インストールの中で @tensorflow/tfjs-node の custom-binary.json を作成しているので、2回目のインストールで成功します)
$ cd node_modules/@tensorflow/tfjs-node/
$ npm i
3. Node-RED を起動します。
$ node-red-start
Node-RED の起動ログが表示されますので、起動が完了したら Ctrl + C で抜けます。
停止する場合は、以下のコマンドを実行します。
$ node-red-stop
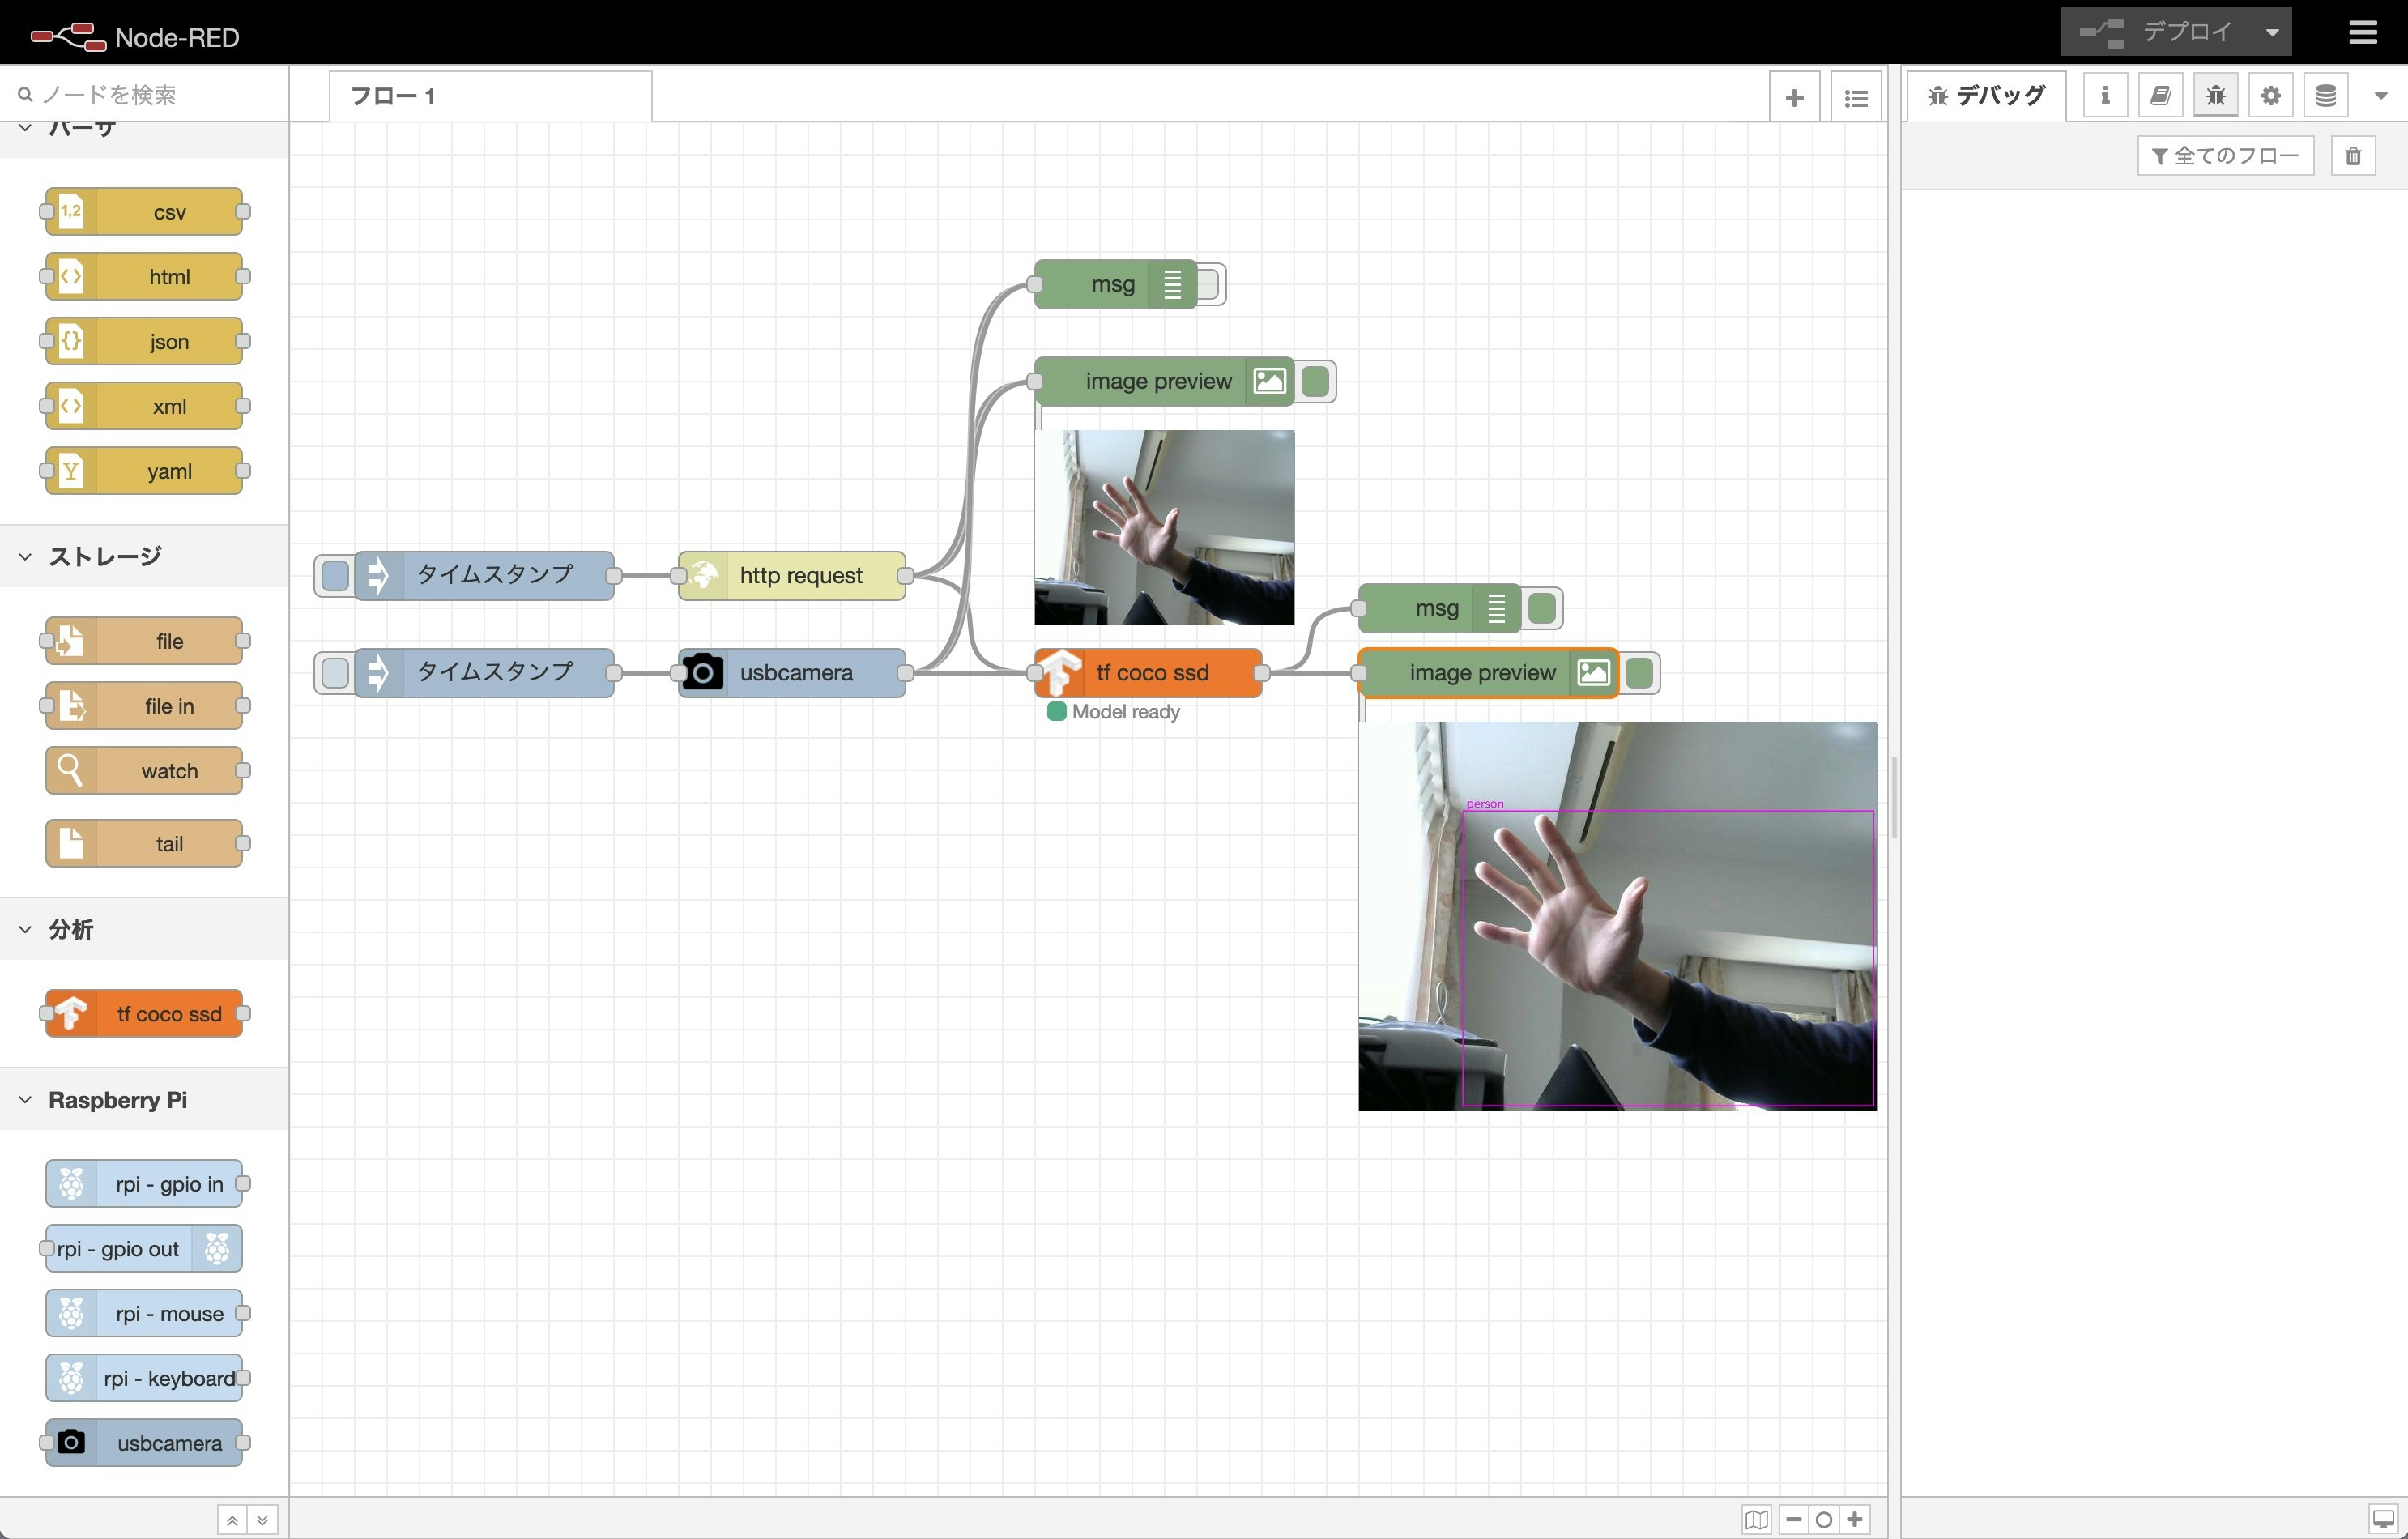
サンプルのフローを動かす
USB カメラで撮影した画像を使用してオブジェクト検出し、結果を Node-RED のフロー上に表示するため、以下の2つのモジュールをインストールします。
- node-red-contrib-image-output
- node-red-contrib-usbcamera
node-red-contrib-usbcamera モジュールを使用するためには、fswebcam コマンドをインストールする必要があります。
$ sudo apt update
$ sudo apt install fswebcam
$ cd ~/.node-red
$ npm i node-red-contrib-image-output
$ npm i node-red-contrib-usbcamera
モジュールをインストールした後は Node-RED の停止・起動を行います。
$ node-red-stop
$ node-red-start
サンプルのフローをインポートします。
[{"id":"7b70c5ee.6f8b54","type":"tab","label":"フロー 1","disabled":false,"info":""},{"id":"536b8b06.e08124","type":"tensorflowCoco","z":"7b70c5ee.6f8b54","name":"","modelUrl":"http://localhost:1880/coco/model.json","scoreThreshold":0.5,"passthru":"bbox","lineColour":"magenta","x":530,"y":340,"wires":[["322a680c.2a6458","91d145e.e45deb8"]]},{"id":"974b536b.811538","type":"image","z":"7b70c5ee.6f8b54","name":"","width":160,"data":"payload","dataType":"msg","thumbnail":false,"active":true,"pass":false,"outputs":0,"x":540,"y":160,"wires":[]},{"id":"6bc3a717.18fcd","type":"http request","z":"7b70c5ee.6f8b54","name":"","method":"GET","ret":"bin","paytoqs":"ignore","url":"https://upload.wikimedia.org/wikipedia/commons/b/b3/Team_Queerala.jpg","tls":"","persist":false,"proxy":"","authType":"","x":310,"y":280,"wires":[["974b536b.811538","536b8b06.e08124","8f34f7cf.94bfe8"]]},{"id":"71825deb.2c1e34","type":"inject","z":"7b70c5ee.6f8b54","name":"","props":[{"p":"payload"},{"p":"topic","vt":"str"}],"repeat":"","crontab":"","once":false,"onceDelay":0.1,"topic":"","payload":"","payloadType":"date","x":120,"y":280,"wires":[["6bc3a717.18fcd"]]},{"id":"322a680c.2a6458","type":"debug","z":"7b70c5ee.6f8b54","name":"","active":true,"tosidebar":true,"console":false,"tostatus":false,"complete":"true","targetType":"full","statusVal":"","statusType":"auto","x":710,"y":300,"wires":[]},{"id":"91d145e.e45deb8","type":"image","z":"7b70c5ee.6f8b54","name":"","width":"320","data":"image","dataType":"msg","thumbnail":false,"active":true,"pass":false,"outputs":0,"x":740,"y":340,"wires":[]},{"id":"8f34f7cf.94bfe8","type":"debug","z":"7b70c5ee.6f8b54","name":"","active":false,"tosidebar":true,"console":false,"tostatus":false,"complete":"true","targetType":"full","statusVal":"","statusType":"auto","x":510,"y":100,"wires":[]},{"id":"20417db3.6bb88a","type":"usbcamera","z":"7b70c5ee.6f8b54","filemode":"0","filename":"image01.jpg","filedefpath":"1","filepath":"","fileformat":"jpeg","resolution":"2","name":"","x":310,"y":340,"wires":[["974b536b.811538","8f34f7cf.94bfe8","536b8b06.e08124"]]},{"id":"e39ca5b2.147f48","type":"inject","z":"7b70c5ee.6f8b54","name":"","props":[{"p":"payload"},{"p":"topic","vt":"str"}],"repeat":"","crontab":"","once":false,"onceDelay":0.1,"topic":"","payload":"","payloadType":"date","x":120,"y":340,"wires":[["20417db3.6bb88a"]]}]
サンプルのフローはGithubにも置いておきます。
動作確認
Node-RED を実行し、サンプルフローを読み込んだ後、以下のようなログが出力されれば正常です。
5 May 12:30:23 - [info] Starting flows
2021-05-05 12:30:24.866596: W tensorflow/core/platform/profile_utils/cpu_utils.cc:98] Failed to find bogomips in /proc/cpuinfo; cannot determine CPU frequency
2021-05-05 12:30:24.867601: I tensorflow/compiler/xla/service/service.cc:168] XLA service 0x7f3dbf7290 initialized for platform Host (this does not guarantee that XLA will be used). Devices:
2021-05-05 12:30:24.867990: I tensorflow/compiler/xla/service/service.cc:176]   StreamExecutor device (0): Host, Default Version
2021-05-05 12:30:24.895666: I tensorflow/stream_executor/platform/default/dso_loader.cc:44] Successfully opened dynamic library libcuda.so.1
2021-05-05 12:30:24.916967: I tensorflow/stream_executor/cuda/cuda_gpu_executor.cc:950] ARM64 does not support NUMA - returning NUMA node zero
2021-05-05 12:30:24.917130: I tensorflow/core/common_runtime/gpu/gpu_device.cc:1618] Found device 0 with properties:
name: NVIDIA Tegra X1 major: 5 minor: 3 memoryClockRate(GHz): 0.9216
pciBusID: 0000:00:00.0
2021-05-05 12:30:24.923907: I tensorflow/stream_executor/platform/default/dso_loader.cc:44] Successfully opened dynamic library libcudart.so.10.0
2021-05-05 12:30:24.937424: I tensorflow/stream_executor/platform/default/dso_loader.cc:44] Successfully opened dynamic library libcublas.so.10.0
2021-05-05 12:30:24.953026: I tensorflow/stream_executor/platform/default/dso_loader.cc:44] Successfully opened dynamic library libcufft.so.10.0
2021-05-05 12:30:24.958246: I tensorflow/stream_executor/platform/default/dso_loader.cc:44] Successfully opened dynamic library libcurand.so.10.0
2021-05-05 12:30:24.974519: I tensorflow/stream_executor/platform/default/dso_loader.cc:44] Successfully opened dynamic library libcusolver.so.10.0
2021-05-05 12:30:24.983350: I tensorflow/stream_executor/platform/default/dso_loader.cc:44] Successfully opened dynamic library libcusparse.so.10.0
2021-05-05 12:30:25.032299: I tensorflow/stream_executor/platform/default/dso_loader.cc:44] Successfully opened dynamic library libcudnn.so.7
2021-05-05 12:30:25.032490: I tensorflow/stream_executor/cuda/cuda_gpu_executor.cc:950] ARM64 does not support NUMA - returning NUMA node zero
2021-05-05 12:30:25.032660: I tensorflow/stream_executor/cuda/cuda_gpu_executor.cc:950] ARM64 does not support NUMA - returning NUMA node zero
2021-05-05 12:30:25.032749: I tensorflow/core/common_runtime/gpu/gpu_device.cc:1746] Adding visible gpu devices: 0
2021-05-05 12:30:26.638460: I tensorflow/core/common_runtime/gpu/gpu_device.cc:1159] Device interconnect StreamExecutor with strength 1 edge matrix:
2021-05-05 12:30:26.638579: I tensorflow/core/common_runtime/gpu/gpu_device.cc:1165]      0
2021-05-05 12:30:26.638612: I tensorflow/core/common_runtime/gpu/gpu_device.cc:1178] 0:   N
2021-05-05 12:30:26.638878: I tensorflow/stream_executor/cuda/cuda_gpu_executor.cc:950] ARM64 does not support NUMA - returning NUMA node zero
2021-05-05 12:30:26.639051: I tensorflow/stream_executor/cuda/cuda_gpu_executor.cc:950] ARM64 does not support NUMA - returning NUMA node zero
2021-05-05 12:30:26.639201: I tensorflow/stream_executor/cuda/cuda_gpu_executor.cc:950] ARM64 does not support NUMA - returning NUMA node zero
2021-05-05 12:30:26.639567: I tensorflow/core/common_runtime/gpu/gpu_device.cc:1304] Created TensorFlow device (/job:localhost/replica:0/task:0/device:GPU:0 with 212 MB memory) -> physical GPU (device: 0, name: NVIDIA Tegra X1, pci bus id: 0000:00:00.0, compute capability: 5.3)
2021-05-05 12:30:26.648679: I tensorflow/compiler/xla/service/service.cc:168] XLA service 0x7eacbb15e0 initialized for platform CUDA (this does not guarantee that XLA will be used). Devices:
2021-05-05 12:30:26.648767: I tensorflow/compiler/xla/service/service.cc:176]   StreamExecutor device (0): NVIDIA Tegra X1, Compute Capability 5.3
cpu backend was already registered. Reusing existing backend factory.
Platform node has already been set. Overwriting the platform with [object Object].
5 May 12:30:27 - [info] Started flows
2021-05-05 12:30:28.221079: I tensorflow/stream_executor/platform/default/dso_loader.cc:44] Successfully opened dynamic library libcudnn.so.7
2021-05-05 12:30:32.507124: I tensorflow/stream_executor/platform/default/dso_loader.cc:44] Successfully opened dynamic library libcublas.so.10.0
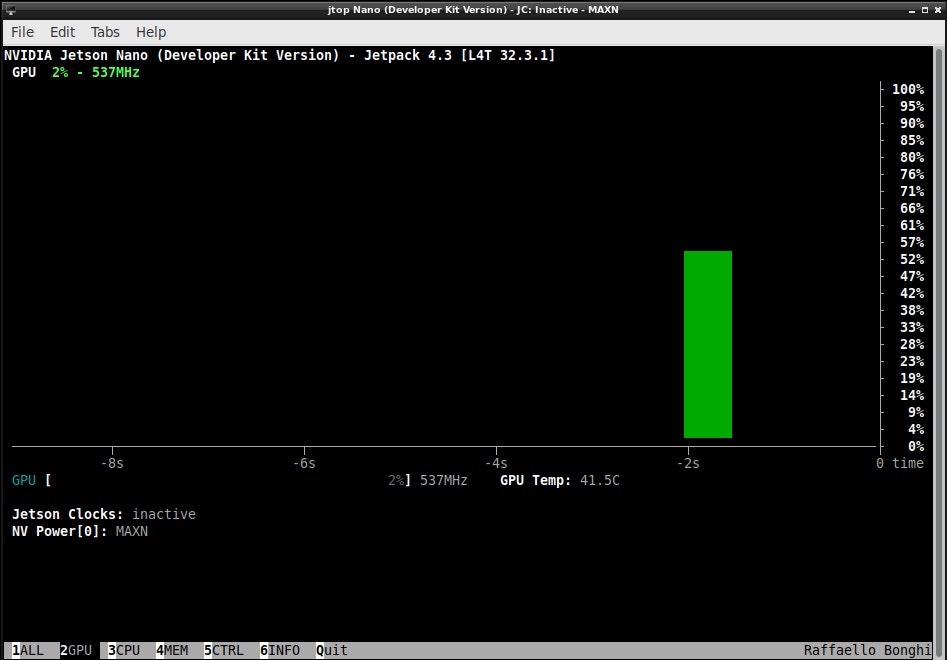
実際に GPU リソースが使用されているか確認する場合、jtop コマンドを実行するのが簡単です。
初回にインストールした場合、OSの再起動が必要です。既にインストールされている場合、最新の jtop コマンドがインストールされます。
以下の手順でインストールします。
$ sudo apt install python-pip
$ sudo -H pip install -U jetson-stats

# 初回の場合のみ
$ sudo reboot
以下の手順で実行します。
$ jtop
まとめ
みなさま、良き Jetson Nano & Node-RED ライフを!